
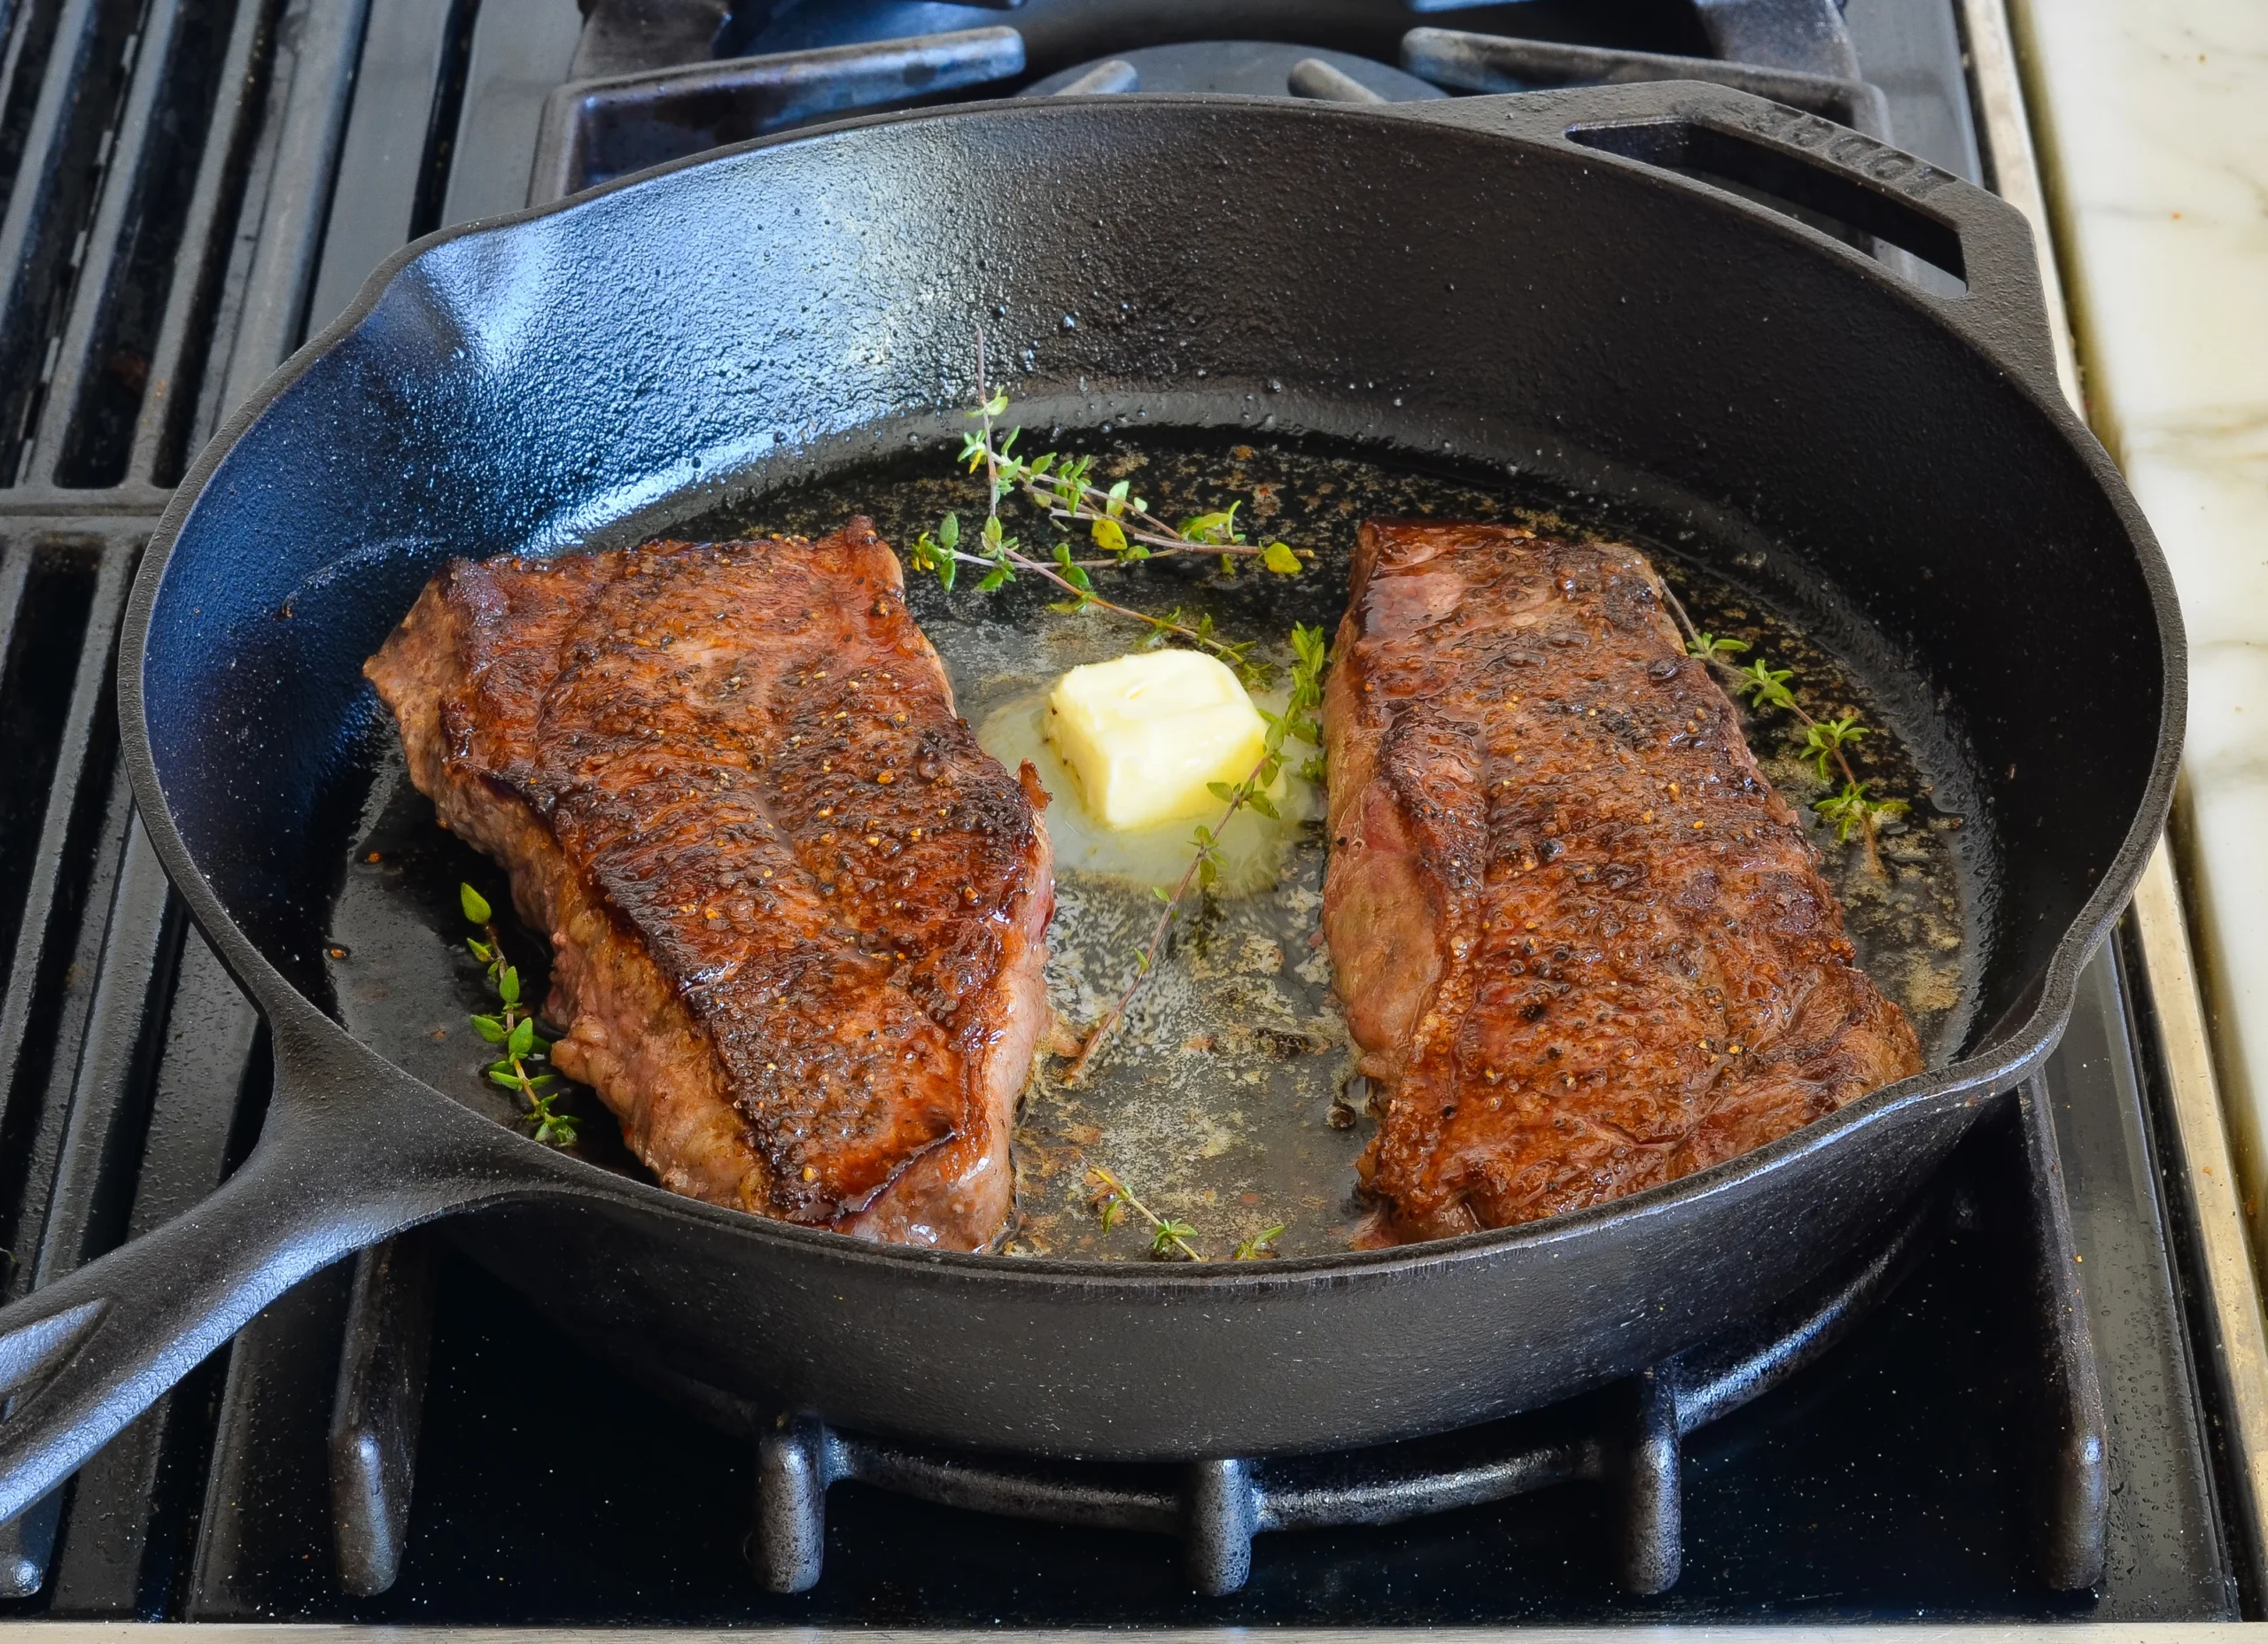
A great pan-seared steak does not require a restaurant kitchen or expensive equipment. The real skill is controlling heat, moisture, and timing so the steak develops a deeply browned crust without overcooking the center.
This method works particularly well with a 1 to 1½-inch thick ribeye, strip steak, or sirloin steak. A heavy skillet, a little high-heat cooking oil, butter, and a thermometer are enough to get started.
The important part is not simply turning the burner to maximum. You need high enough heat to brown the surface, but you also need to reduce the heat when butter and aromatics are added so they do not burn.
Why You’ll Like This Recipe
- Restaurant-style crust: Proper surface drying and high pan heat encourage deep browning.
- Simple ingredients: The steak, salt, pepper, oil, butter, garlic, and herbs do most of the work.
- No grill required: A heavy skillet works well indoors.
- Easy temperature control: You will learn when to increase, reduce, and briefly remove the pan from the heat.
- Beginner-friendly: A thermometer takes much of the guesswork out of judging doneness.
Ingredients
For 2 servings:
- 2 steaks, about 1 to 1½ inches thick, preferably ribeye, New York strip, or sirloin
- 1–1½ teaspoons kosher salt, or to taste
- ½ teaspoon freshly ground black pepper
- 1 tablespoon neutral high-heat oil, such as avocado, canola, or grapeseed oil
- 2 tablespoons unsalted butter
- 2 garlic cloves, lightly crushed
- 2–3 sprigs fresh thyme or rosemary
Choosing the steak
A steak around 1 to 1½ inches thick is easier to sear properly than a very thin steak because you have more time to develop a crust before the center becomes overcooked.
Ribeye has more internal fat and produces a rich result. Strip steak is usually a little leaner with a firm texture. Sirloin can work well when you want a less expensive option.
Equipment
You only need:
- Heavy cast-iron or stainless-steel skillet
- Tongs
- Paper towels
- Instant-read meat thermometer
- Cutting board
- Small spoon for basting, optional
A heavy skillet is useful because it retains heat when the relatively cool steak hits the surface.
How to Pan-Sear Steak Like a Restaurant Chef
1. Dry the steaks thoroughly
Remove the steaks from their packaging and pat both sides very dry with paper towels.
This step matters more than many beginners realize.
Water on the surface must evaporate before the steak can brown effectively. A wet steak spends more of its early cooking time steaming instead of developing a crust.
2. Season generously
Season both sides with salt and freshly ground black pepper.
For a straightforward approach, season immediately before cooking. If you prefer to salt earlier, do it far enough ahead for the salt to penetrate the meat rather than salting just a few minutes before cooking.
Do not coat the steak with a thick layer of pepper. Excess pepper can become bitter when exposed to intense pan heat.
3. Preheat the skillet
Place the dry skillet over medium-high to high heat.
Give it several minutes to heat thoroughly.
You are looking for a properly heated cooking surface, not necessarily a pan that is smoking aggressively.
Add the oil just before the steak goes in. It should become fluid and shimmer across the surface.
4. Put the steak in the pan
Carefully place the steak in the skillet.
You should hear an immediate, strong sizzle.
Press the steak gently for the first few seconds if the center is not making good contact with the pan.
Then leave it alone long enough to develop color.
For a 1-inch steak, start with approximately 2–3 minutes on the first side, depending on the pan, burner, steak temperature, and desired doneness.
You are looking for a deep brown crust rather than a pale gray surface.
5. Flip and continue cooking
Turn the steak with tongs.
The second side should also develop a browned crust.
Do not feel that you have to leave the steak untouched for the entire cooking process. Turning more frequently can help control the rate at which the outside browns while the center cooks.
For a thicker steak, lower the burner once the crust has developed and continue cooking more gently.
6. Lower the heat before adding butter
This is one of the most important heat-control steps.
Once the steak has developed a good crust, reduce the heat to medium or medium-low.
Add the butter, crushed garlic, and herbs.
The butter should foam and become aromatic. It should not immediately turn black.
If the butter starts smoking heavily or darkening extremely quickly, the pan is too hot. Move it off the burner briefly and lower the heat.
7. Baste the steak
Tilt the skillet slightly so the melted butter collects at one side.
Use a spoon to repeatedly scoop the butter over the top of the steak.
Baste for about 30–60 seconds, then check the internal temperature.
The butter carries the flavor of the garlic and herbs across the surface while helping build a rich finish. Butter-basting is a common steak technique, although it is best controlled at a lower temperature because butter can burn under excessive heat.
[Photo: Show the pan tilted slightly while a spoon pours foaming herb-and-garlic butter over the steak.]
8. Check the internal temperature
Insert the thermometer into the thickest part of the steak from the side.
Do not rely entirely on cooking time. Steak thickness and starting temperature can change the result considerably.
For food safety, the USDA recommends cooking whole beef steaks to a minimum internal temperature of 145°F (62.8°C) and allowing them to rest for at least three minutes.
If you prefer a different level of doneness, remember that visual appearance alone is not a reliable food-safety test. A thermometer gives you a much more dependable measurement.
9. Rest the steak
Transfer the steak to a clean cutting board or plate and allow it to rest for at least 3 minutes.
For a thick steak, a few additional minutes can make serving easier.
Do not immediately slice it into pieces while it is still sizzling hot.
10. Slice and serve
Slice against the grain into manageable pieces.
A sharp knife will make cleaner cuts and reduce the need to press down on the steak.
Serve immediately while the crust is still at its best.
Mastering Heat Control
Heat control is what separates a decent pan-seared steak from one that is difficult to manage.
Think of the cooking process as three heat stages:
Stage 1: High heat for browning
Use strong heat when the steak first enters the pan.
The goal is to quickly remove surface moisture and create browning.
Stage 2: Moderate heat for the center
Once the crust is established, reduce the heat.
This gives the interior more time to cook without burning the outside.
Stage 3: Lower heat for butter basting
Butter contains milk solids that can burn if exposed to excessive heat.
Lowering the temperature before adding butter gives you time to baste without turning the butter bitter and black.
The mistake is staying at maximum heat from beginning to end.
High heat is a tool for browning, not a setting that needs to remain unchanged throughout the entire cook.
Important Tips for Better Results
Dry steak = better crust
Moisture is the enemy of fast browning.
Pat the steak thoroughly dry immediately before seasoning and cooking.
Don’t overcrowd the pan
If the steaks are packed tightly together, the pan can lose heat and excess moisture can collect around the meat.
Use a pan large enough to leave some space between the steaks.
Don’t burn the butter
Butter should foam and smell nutty and aromatic.
If it is turning dark brown or black almost immediately, reduce the heat.
Use the thermometer from the side
For a thick steak, inserting the thermometer from the side makes it easier to reach the center accurately.
Don’t press the steak repeatedly
You do not need to flatten the steak against the pan.
Pressing can improve contact briefly when the steak first goes into the skillet, but constant pressing is unnecessary.
Remember carryover cooking
A steak can continue changing temperature after it leaves the pan. That is another reason to monitor the internal temperature rather than simply adding extra cooking time.
Common Mistakes
Problem: The steak is gray instead of deeply browned
Why it happens: The surface was wet, the pan was not sufficiently heated, or too many steaks were placed in the skillet.
How to fix it: Dry the steak thoroughly, heat the pan properly, and avoid overcrowding.
Problem: The outside is burned but the center is undercooked
Why it happens: The heat remained too high for too long.
How to fix it: Use high heat to establish the crust, then reduce the heat and cook the center more gently.
Problem: The butter burns
Why it happens: Butter was added while the skillet was still extremely hot.
How to fix it: Lower the heat before adding butter. If necessary, briefly remove the pan from the burner.
Problem: The steak sticks to the pan
Why it happens: The steak may have been moved too early or the pan was not properly heated.
How to fix it: Give the steak time to brown before trying to turn it. Use a thin spatula only if necessary, although tongs are generally easier for handling steaks.
Problem: The steak is dry inside
Why it happens: It was cooked beyond the desired level.
How to fix it: Start checking the internal temperature earlier rather than relying on a fixed number of minutes.
Problem: The crust is good but the flavor is flat
Why it happens: The steak may have been under-seasoned.
How to fix it: Season both sides adequately with salt before cooking and finish with the flavorful butter, garlic, and herbs.
Ingredient Substitutions
Butter
You can replace butter with ghee or clarified butter.
Effect: Ghee has a higher smoke point and a slightly different flavor, while still providing richness.
Fresh herbs
Rosemary and thyme are interchangeable for this method.
Effect: The cooking technique remains the same, but the aroma changes.
Neutral cooking oil
Canola, avocado, grapeseed, or another suitable neutral high-heat oil can be used.
Effect: Flavor differences are minor because the oil’s main job is to help transfer heat to the steak.
Garlic
Garlic is optional.
Effect: Removing it does not affect the basic searing technique; you simply lose its aromatic flavor.
Recipe Variations
Garlic-Butter Steak
Use extra garlic during the final basting stage and spoon the flavored butter over the steak immediately before serving.
Pepper-Crusted Steak
Use freshly cracked black pepper more generously immediately before cooking.
Because pepper can become bitter at very high temperatures, reduce the heat once the initial crust has formed.
Herb Butter Steak
Finish the steak with butter and fresh thyme or rosemary, then add a small spoonful of the pan butter over each serving.
Steak with a Quick Pan Sauce
After removing the steak, lower the heat and use the browned bits in the skillet as the base for a simple pan sauce.
The browned residue left in the skillet is valuable flavor, so avoid discarding it before checking whether it can be used for a sauce.
Storage and Reheating
Cooked steak should be refrigerated promptly in a covered container.
For food safety, USDA guidance recommends refrigerating perishable foods promptly and keeping the refrigerator at 40°F (4.4°C) or below.
For the best texture, avoid repeatedly reheating the entire steak.
Instead, slice only what you need and warm it gently in a skillet over moderate heat.
You can also use leftover steak cold in sandwiches, salads, or wraps.
Make-Ahead Instructions
You can prepare the steaks before cooking by trimming any unwanted exterior fat and patting the surfaces dry.
Season shortly before cooking, or use an earlier salting method if you understand how the timing affects the surface moisture.
The actual searing and butter-basting should be done shortly before serving.
This is one recipe where the final cooking stage is best kept close to mealtime because the crust is most enjoyable immediately after cooking and resting.
Serving Suggestions
Pan-seared steak pairs well with simple sides that do not compete with the browned crust.
Try:
- Crispy roasted potatoes
- Mashed potatoes
- Sautéed mushrooms
- Green beans
- Roasted vegetables
- Simple green salad
- Creamed spinach
A small amount of the garlic-herb butter from the pan can also be spooned over the sliced steak before serving.
Recipe FAQ
What is the best pan for searing steak?
A heavy cast-iron or stainless-steel skillet works particularly well because it can maintain substantial heat when the steak is added.
Should I cook steak on high heat the entire time?
No. High heat is useful for developing the initial crust, but reducing the heat afterward gives you better control over the center and prevents the butter and aromatics from burning.
Should I put butter in the pan at the beginning?
It is better to add butter toward the end. Starting with a high-heat cooking oil gives you more control during the initial sear, while butter is better suited to the lower-temperature basting stage.
How do I know when my steak is done?
Use an instant-read thermometer inserted into the thickest part. Cooking time alone is unreliable because steak thickness, starting temperature, pan material, and burner strength all vary.
For food safety, USDA recommends a minimum internal temperature of 145°F (62.8°C) for whole beef steaks, followed by at least a three-minute rest.
Why does my steak smoke so much?
Some smoke is possible during high-heat searing, but heavy smoke can indicate that the pan or oil is excessively hot.
Reduce the burner and improve ventilation. Do not leave an unattended skillet heating on the stove.
Should I flip the steak only once?
Not necessarily. A steak can be flipped more than once. The important things are maintaining good pan contact, developing the crust, and controlling the internal temperature.
Recipe Card
Pan-Seared Steak with Garlic Herb Butter
Prep Time: 10 minutes
Cook Time: 8–12 minutes
Resting Time: 3–5 minutes
Total Time: About 25 minutes
Servings: 2
Ingredients
- 2 steaks, 1–1½ inches thick
- 1–1½ teaspoons kosher salt
- ½ teaspoon freshly ground black pepper
- 1 tablespoon neutral high-heat oil
- 2 tablespoons unsalted butter
- 2 garlic cloves, lightly crushed
- 2–3 sprigs fresh thyme or rosemary
Instructions
- Pat the steaks completely dry with paper towels.
- Season both sides with salt and pepper.
- Heat a heavy skillet over medium-high to high heat.
- Add the oil and place the steaks in the hot skillet.
- Sear until a deep brown crust forms, about 2–3 minutes on the first side.
- Flip and continue cooking while monitoring the internal temperature.
- Reduce the heat to medium or medium-low.
- Add butter, garlic, and herbs.
- Tilt the pan and baste the steaks with the foaming butter for 30–60 seconds.
- Check the internal temperature in the thickest part.
- Remove the steaks and allow them to rest for at least 3 minutes.
- Slice against the grain and serve.
Optional Notes
- Keep the steak dry before it enters the pan.
- Do not use maximum heat throughout the entire cooking process.
- Add butter only after the initial crust has formed.
- Use a thermometer rather than relying entirely on cooking time.
- USDA recommends whole beef steaks reach at least 145°F (62.8°C) and rest for at least three minutes for food safety.
Storage
Refrigerate leftover cooked steak promptly in a covered container. Reheat gently and only warm the portion you plan to eat.